
TL;DR
Switching to chatbot-based comments gives your users a better commenting experience, yields key learnings about your readers, establishes a new lead source for you and can boost your SEO and engagement metrics. You can see it in action at the bottom of this post. Below I’ll expound on why you should consider making this switch and then show you exactly how to do it using an entirely open source stack (WordPress, N8n and TypeBot).
The problem with traditional comments
If you have a WordPress blog and you have comments enabled, odds are you’re using the standard WordPress comments or a third-party tool like Disqus or Intense Debate. This standard static comment box paradigm is a missed opportunity to deeply engage with the reader. When he or she finishes your post this is the moment of max engagement and you have a fleeting opportunity to engage and ask questions. Think about it like this: if your post was a talk you had just given from a stage and you had a chance to chat with each member of the audience, would you simply say “what did you think?” and walk away after their response or would you have a conversation? I’m going to show you a better paradigm in which you can upgrade your static one-shot comment UX to a more conversational experience that better engages your readers, builds your newsletter list and enriches those leads with whatever you want to know about them.
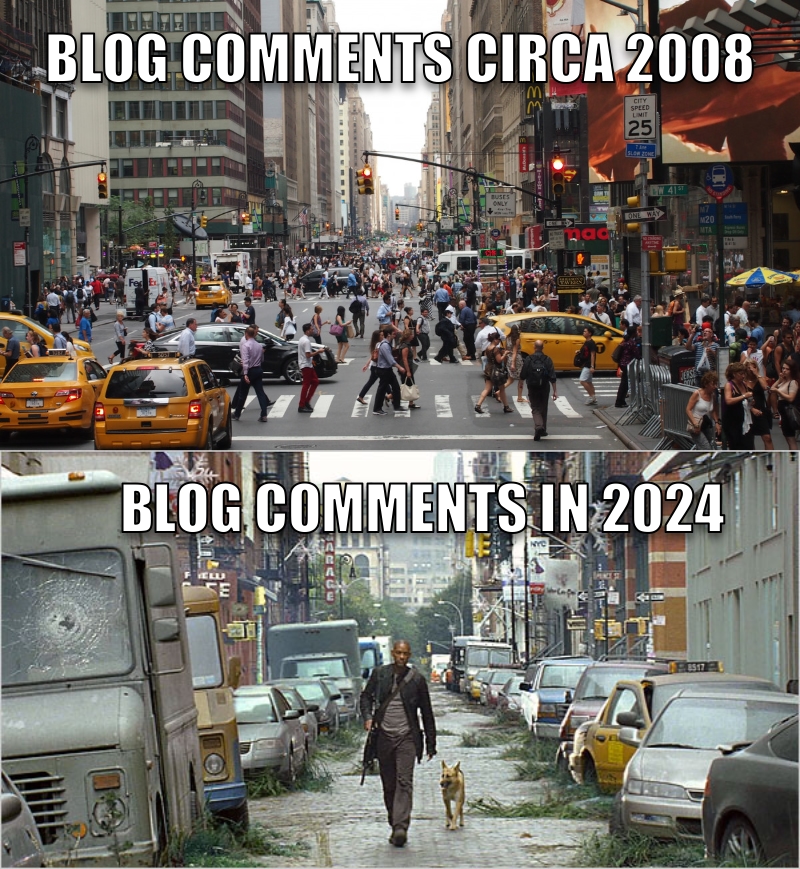
The other problem is one of competition. Back in the day of early web2 if you wrote a solid blog post you could get an involved exchange going in the comment section. As the post author you loved this user-generated content because you’re readers effectively became unpaid writers for you expanding the SEO of your post in ways you hadn’t imagined. You’d get a virtuous cycle: elevated search results -> more readers a fraction of which became more commenters -> elevated search results, etc. But these days your boring comment box is competing with social media and guess what? It’s losing. These conversations that used to occur on your real estate and benefit your SEO have shifted primarily to social media platforms. The blog comments section has taken on more of a Will Smith I am Legend vibe:
I’m going to show you how to spice up the commenting experience for your readers and in the process help you win back some SEO while building and enriching your lead list and learning more deeply what your readers want.
The steps we’re going to implement here are:
- Setup the chatbot that you’ll embed in place of your current comment box
- Modify your WordPress site to disable the traditional comment system and substitute your inline chatbot
- Configure your CRM to accept the data from these commenters as leads
- Setup middleware to send chatbot leads into your CRM system
- Route the comment portion of the chat exchange back to WordPress
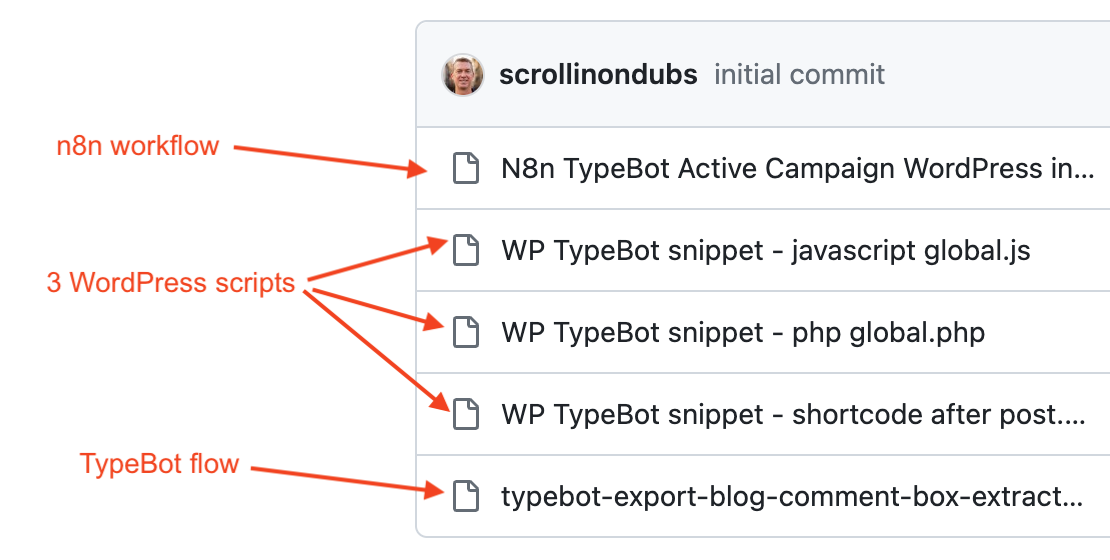
Fair warning you needn’t be a programmer to perform these steps but you do have to get your hands dirty a bit here. I’ve put 5 files in this GitHub repo to make your life easier. You can import those to each corresponding system to save some time.
We’re going to go section-by-section here and by the end you should have the exact same setup as I do below. Note: these instructions are with WordPress as the CMS, TypeBot as the chatbot service and ActiveCampaign as the CRM but you could just as easily swap out a different CMS, CRM and/or chatbot service. The overall setup will be the same. I’m using Google Sheets as an intermediate repository and n8n as the middleware which has support for a number of different systems so the general framework here can be modified for any permutation of tools to get the same result. Let’s dig in.
Setup your chatbot
You could technically use any chatbot service you like but I’m a fan of TypeBot.io. Its builder interface is very intuitive, it has a cloud-hosted option to get going quickly and it’s open source so there’s no vendor lock-in and its documentation is solid. The easiest way to get going with it is to create a free account on their cloud hosting service and run your chatbot from there. You can always cut over to a Docker-based installation running on your own server down the road if you need to host your own instance.
Create a new TypeBot and choose “Import a file.” Download the download my Flow as a .JSON file from the Github repo and then upload that file into your account.
 This is what you should see if it worked:
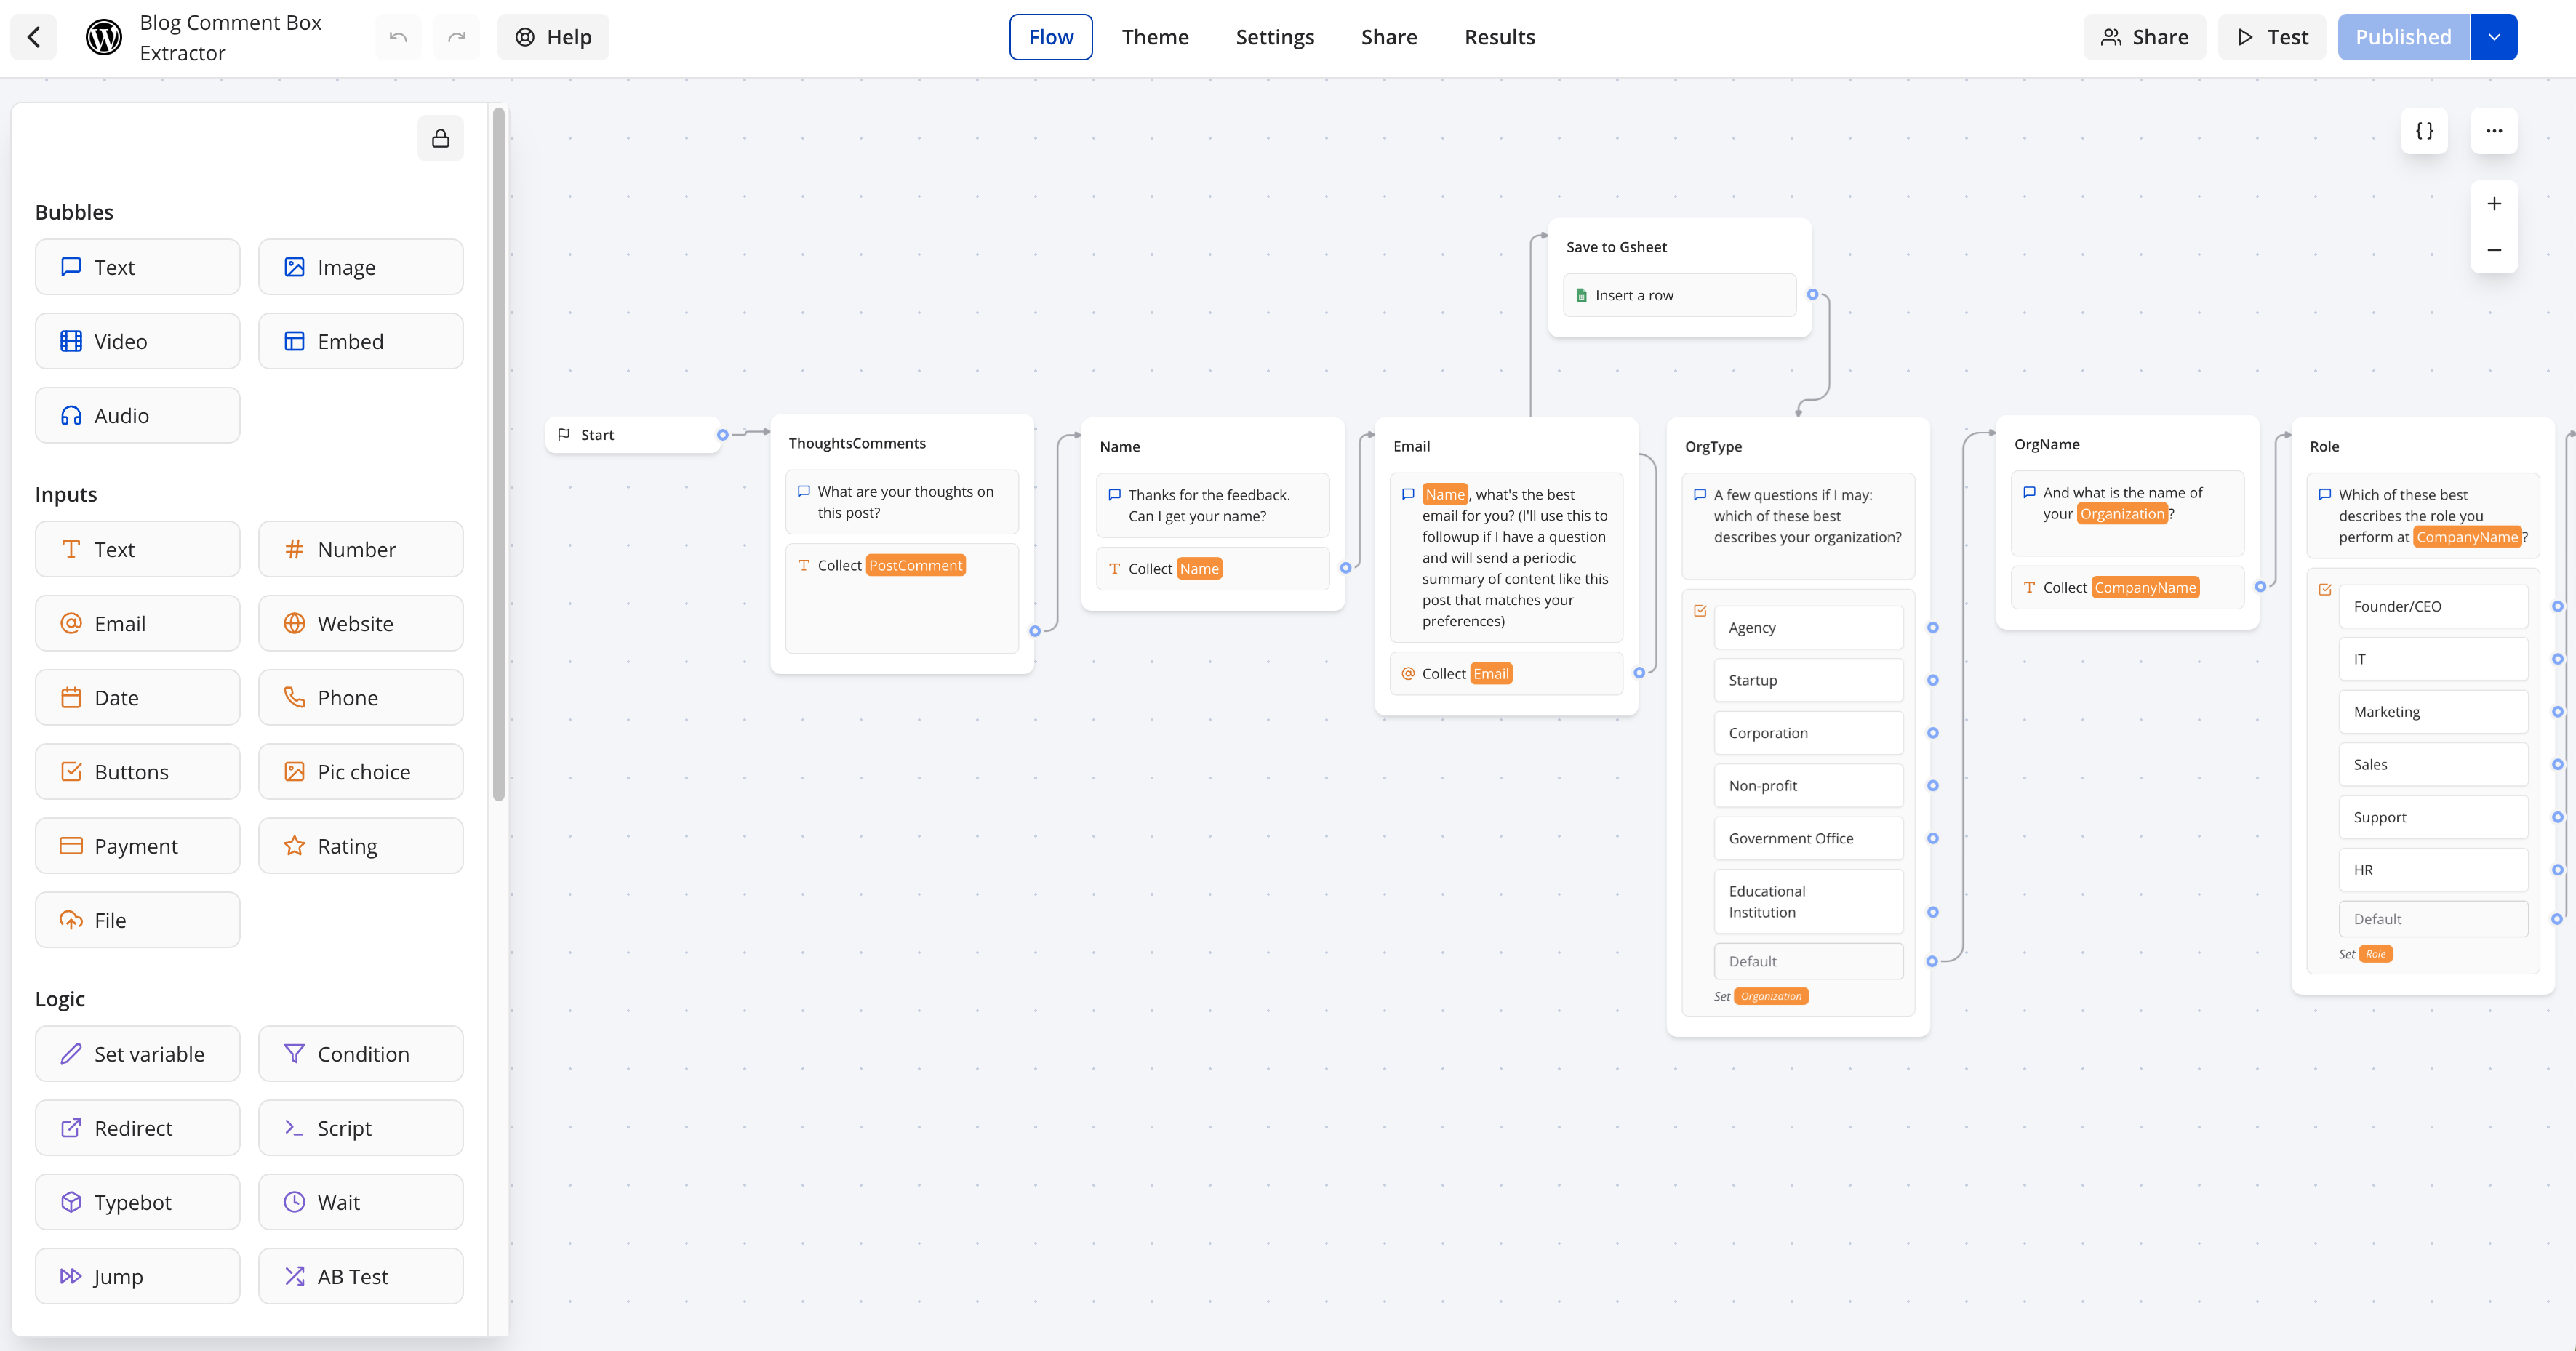
I have mine progressively writing the respondent’s answers to a Google Sheet as the user submits data. You can just duplicate that Gsheet to your own Google account and update the GoogleSheet TypeBot node to point it to your own sheet. If you need additional help in that process this is the documentation that explains how you write the results to Google Sheets.
If all went well you should now have a standalone chatbot working that looks like this for collecting comments. So far so good? Next we need to modify our WordPress instance and do a heart transplant to swap out our inline embedded version of the chatbot we just made for the traditional WordPress comment box.
Modify your WordPress instance
TypeBot has an official WordPress TypeBot plugin and if you only wanted a basic install that’s by far the easiest way to get the chatbot running on your site. I’m going to show you however a bit more-involved approach that grabs and logs the UTM params of the visitor along with the URL of the blog post, the Post ID and the original HTTP Referer so you have some attribution data on your leads and can post the user-submitted comment back to WordPress. If you don’t care about having user responses appear as comments and extracting attribution data, configure the TypeBot plugin above to display your bot after blog posts and congratulations you’re all done!
If you want the same setup I have you’ll need to install these two free WordPress plugins in your WP instance:
Both are free to use and can be installed via the built-in WordPress plugin installer.
Next we need to disable the traditional comment box on our site. There are multiple ways to achieve this but I found it simplest way is to just add this as Custom CSS to my theme:
.comment-respond {
    display: none;
}
Go into Appearance > Customize > Additional CSS, paste it in there and Publish:

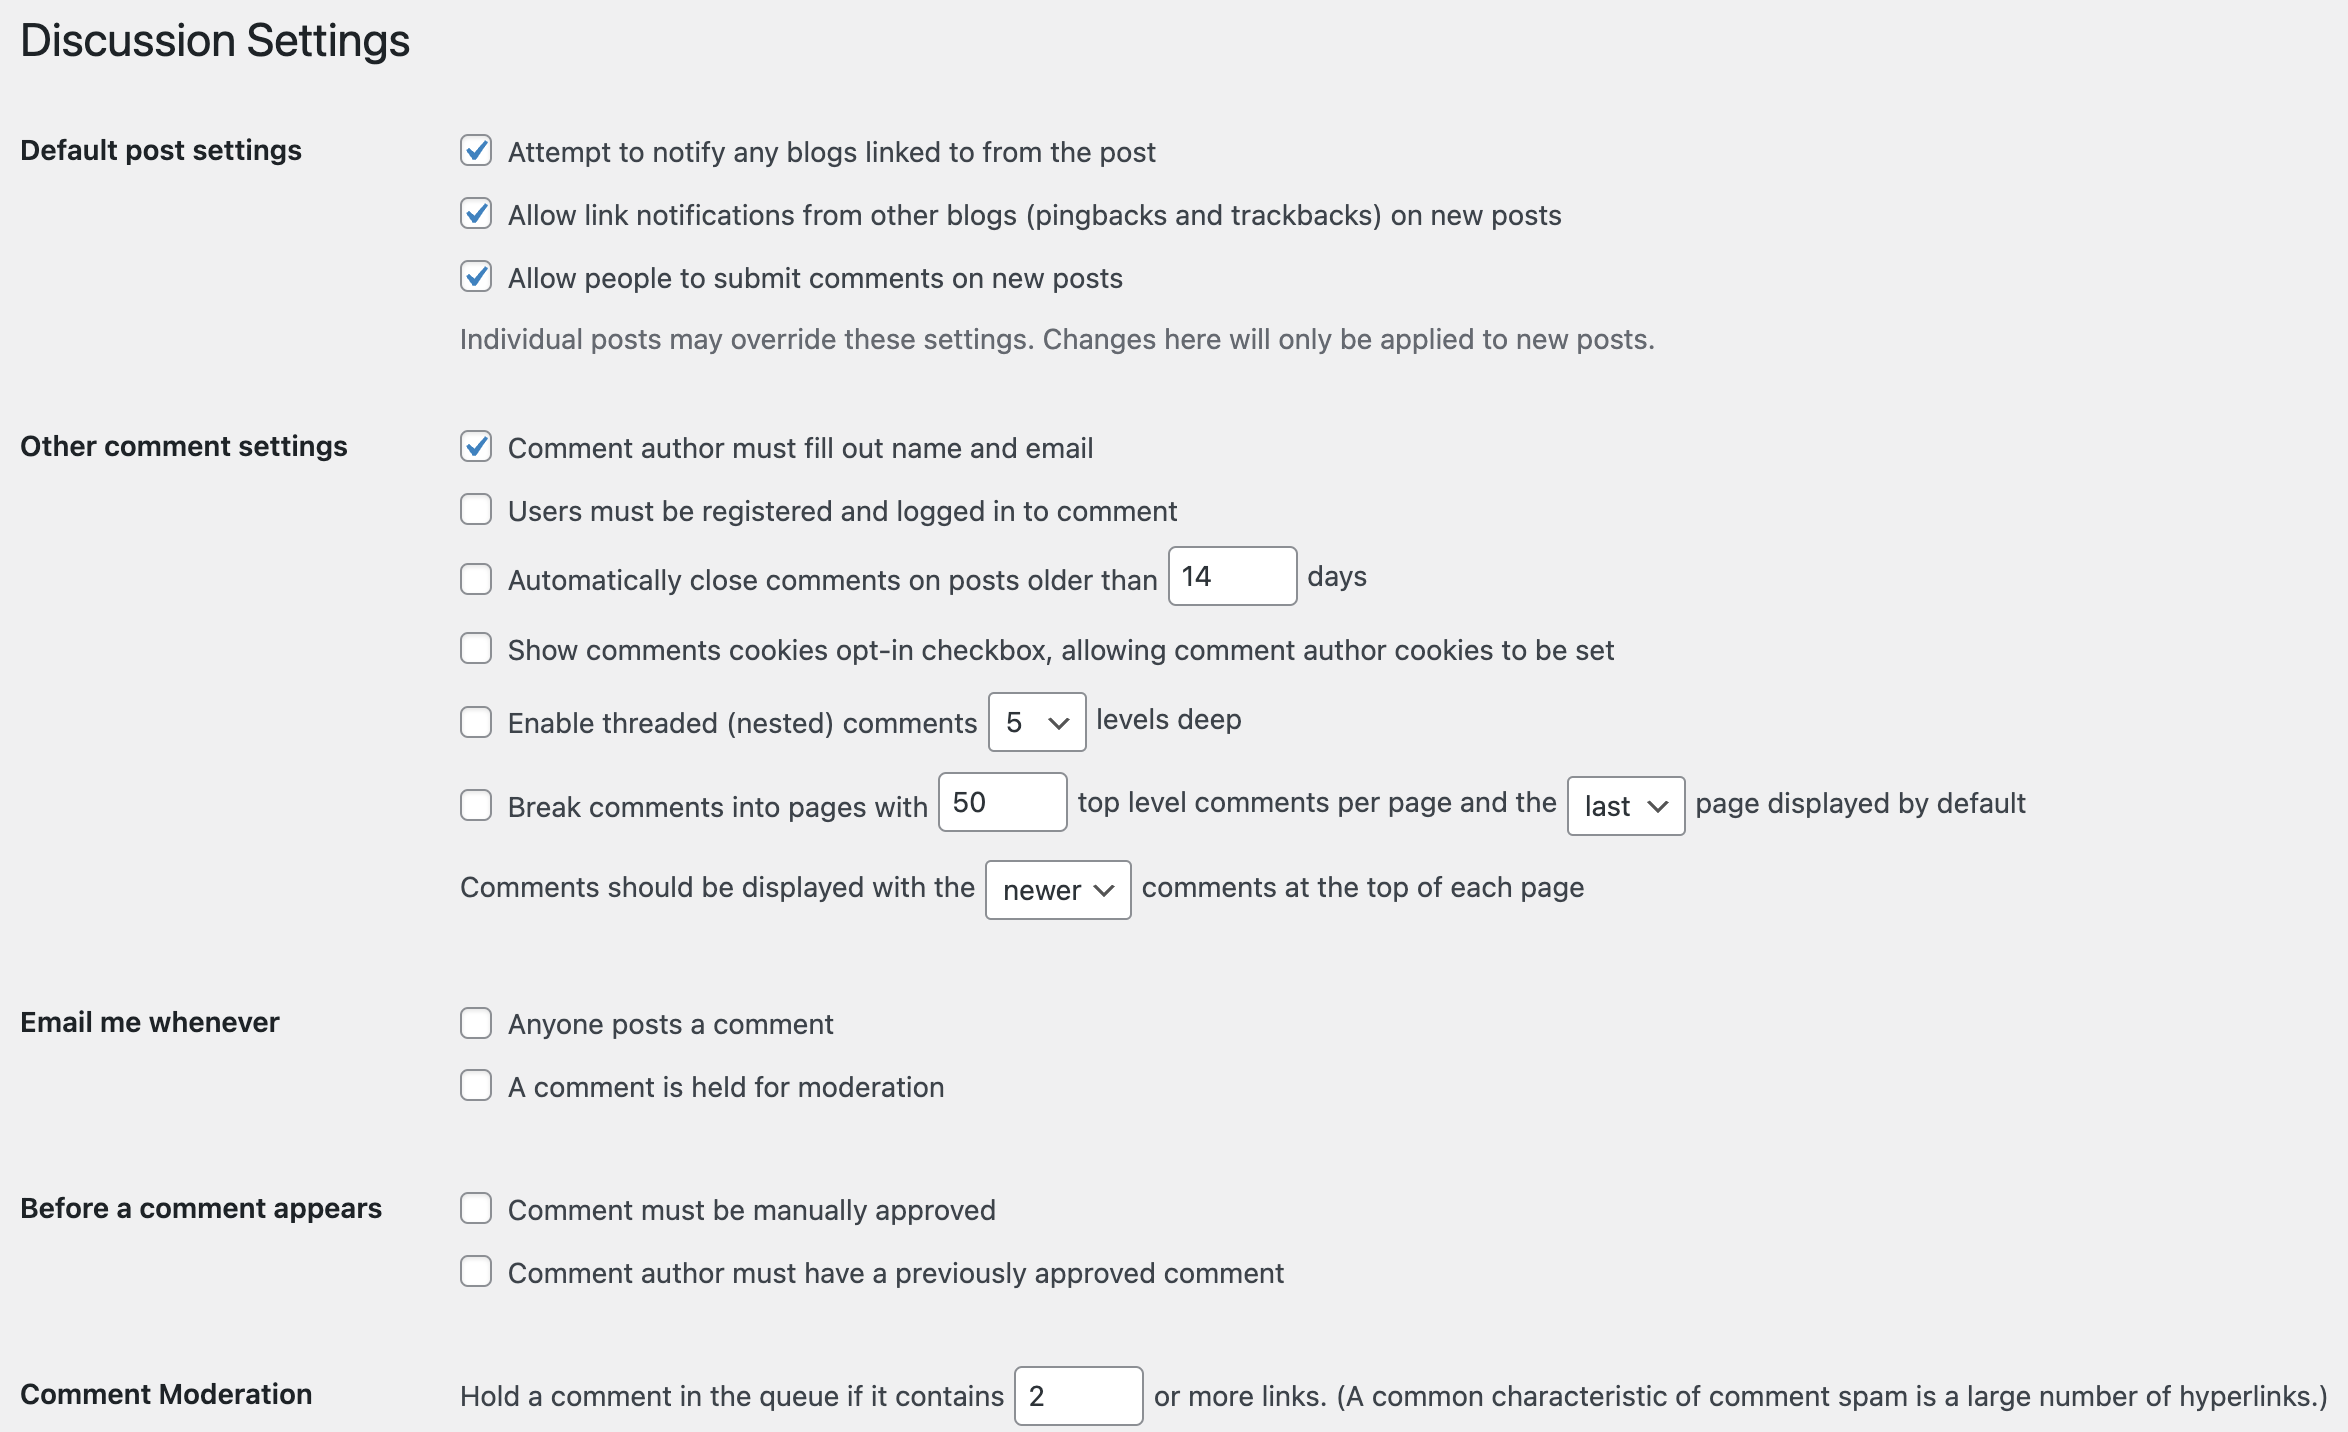
Go to Settings > Discussion and adjust your settings to these:
Now we’re going to use that WP Code Lite plugin to embed the TypeBot inline using Javascript.
You’re going to go into Code Snippets and add these three files from the GitHub repo:
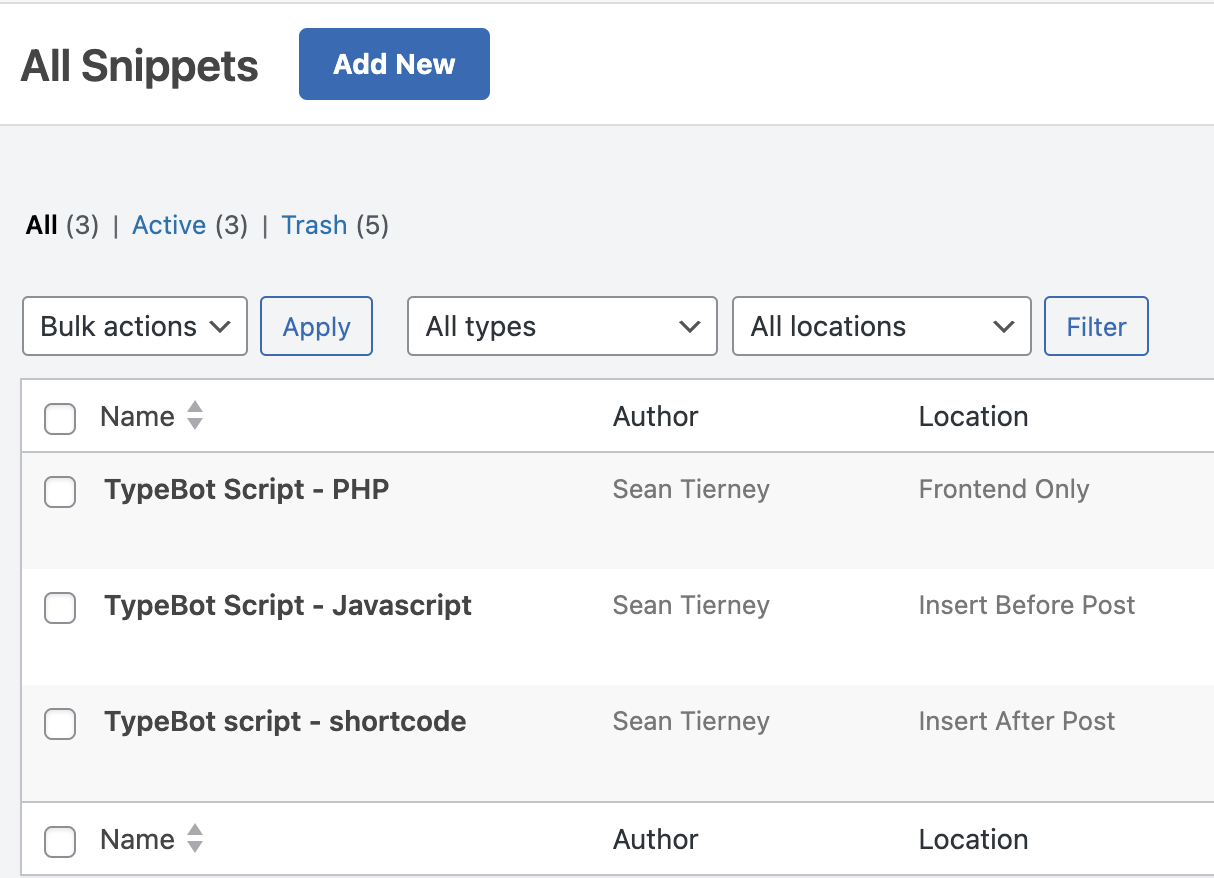
This table shows the settings for each. You need to make sure you toggle the to “Active” for each one:
|
filename |
filetype |
location |
conditional logic |
priority |
|---|---|---|---|---|
|
PHP |
PHP |
front-end only |
none |
1 |
|
Javascript |
Javascript |
insert before post |
none |
5 |
|
Shortcode |
HTML |
insert after post |
postType = post |
10 |
If you are self-hosting your TypeBot instance (not using the cloud-based version) you’ll want to make sure to update line 65 of the PHP script to reflect the custom domain where your bot is running. I have conditional logic on my shortcode script so it only appears after blog posts but if you wanted it on pages you can update that logic.
Assuming you’ve done this all correctly you should now have completed the heart transplant and have your inline chatbot running in place of your comments field. Nice.
Now we need to setup your CRM to accept the leads properly.
Configure your CRM
Again I’m using ActiveCampaign but you could just as easily set this up with HubSpot or whichever CRM you prefer.
First create a list to house your leads.
Next add the custom fields to your contact list to store the info you’re collecting via your TypeBot flow. If you’re duplicating my setup you’ll add these custom fields:

Now got to Settings > Developer and copy your API URL and API KEY to a text file. We’ll need those in the next step.
Configure your middleware
We’ll be using N8n as our middleware that routes leads and comments to their appropriate places. Like TypeBot the easiest way to get started is to create free account on their cloud-hosted version but they too have a downloadable open source version you can run via Docker if you decide you need to host your own instance.
Create a new workflow in n8n and go to the 3 dots in the upper-right corner and click “Import from URL” and copy/paste this URL to the n8n workflow in Github. Close out the dialogue and if it worked your workflow canvas should now look like this:
 Now you’ll need to edit the Google Sheets nodes so they both point to the Google Sheet you setup earlier that’s collecting your leads. Likewise you’ll need to edit the ActiveCampaign nodes to point to your ActiveCampaign instance. Use the API URL and API KEY you copied to a text file earlier for that credential. Lastly, disable the HTTP REQUEST node for now. This is the step that posts back to WordPress and we want to skip that since we haven’t configured our WordPress instance to accept these comments yet.

Test out the workflow via the orange “Test” button at the bottom of the canvas to make sure it’s pulling leads from Google Sheets into your ActiveCampaign instance. Obviously if you’re using a different CRM, swap the AC nodes for the equivalent node type that integrates with whichever CRM you’re using. This is the advantage of using middleware like N8n in that it’s a middleman that allows you to route data wherever it needs to go and even into multiple systems if need be. They support 1000+ different app integrations so it likely integrates with whatever system you’re using to handle leads.
The leads from your Google Sheets should start appearing within a minute (or whatever custom update interval you specified) in your ActiveCampaign contacts list. Assuming it all works properly you’re now ready for the last step: we need to route the comment portion of their chat back to WordPress so it appears as a comment on the blog post. Let’s set that up now.
Route the comment back to WordPress
You should already have the WordPress REST API Authentication plugin installed on your instance. We’re going to use this to enable our WordPress instance to receive authenticated inbound API requests.
Follow these instructions to enable the JWT authentication method and generate your JWT Token. This makes is to your WP instance accepts inbound requests from you and only you. Copy that token into a text file for now.
Now edit the HTTP Request node you disabled earlier in your n8n workflow. Edit the Header Auth credential:

And create a new one that uses your JWT Token:
Name = Authorization
Value = Bearer PASTE_YOUR_JWT_TOKEN_HERE

Save that, enable that node of the workflow and try a new chat to test it out. Make sure the workflow itself is set to active. Assuming everything works properly it should log the partial result to Google Sheets once you specify your email address in the chat. N8n will then pickup the lead from Google Sheets, send it to ActiveCampaign and route the comment data back to your WordPress instance so it appears under the blog post. If it’s not working at this point most likely you have either forgotten to specify the Bearer portion in the JWT token value field or you may have comments disabled in WordPress. You can always see debug output in your n8n instance by going to the “Executions” tab of the workflow. Please note: I’m not providing tech support on this setup. I make these files and instructions available to anyone who wants to set it up for themselves as I’m not charging for this as a product I’m not providing support on it. ChatGPT is your friend. I used it extensively to figure this all out.
Wrapping up
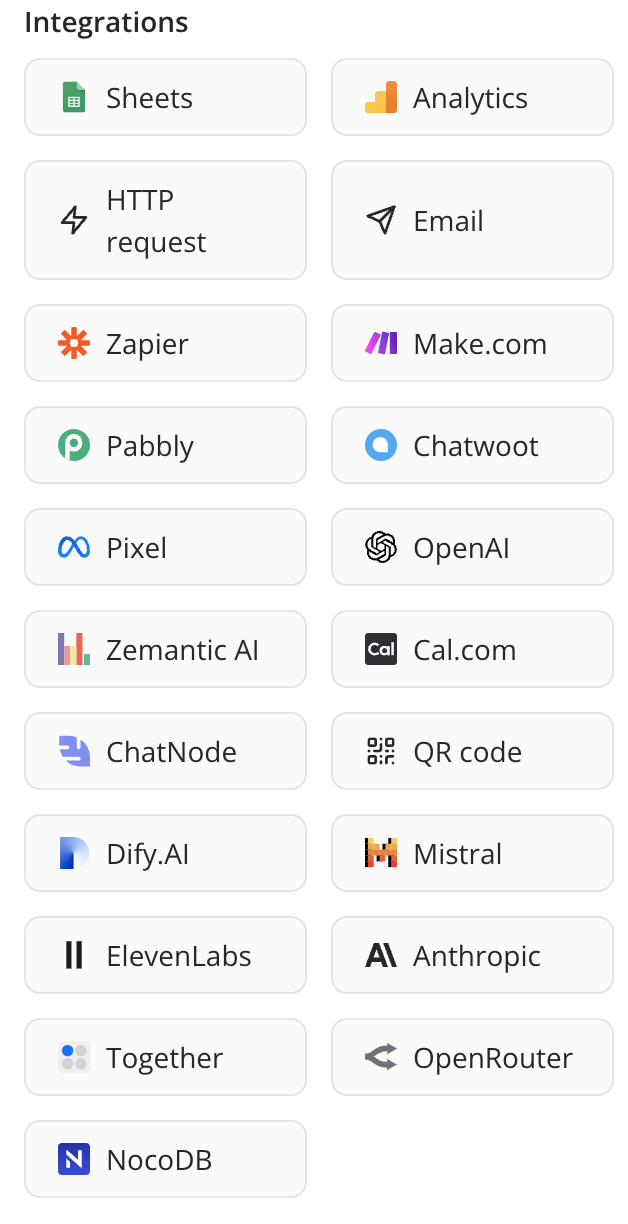
Congrats! You now have the exact same setup I do with using a chatbot to handle your WordPress post comments. The attribution model for the UTM params is “last touch” – if UTM params are present in the URL it will cookie the values and then pass them through when the contact info is submitted in the chat. If you want to take things further you can play around with using conditional logic in the TypeBot flow or even adding one of the LLM nodes to get an even more organic conversation that adapts on the fly to what your readers are saying. You shouldn’t get automated bot spam because this is a bespoke setup that spammers haven’t yet targeted but if you do, just add a conditional step in your n8n workflow and invoke an LLM to decide whether to pass the comment back to WP. TypeBot has all these great integrations that allow you to do really cool stuff right from within their chat:
 I hope this setup helps you create a more engaging commenting experience for your readers and gives you some additional insights that inform your content writing as well and a list of interested readers who want to hear from you in the future.
And now if you’re read this far, let’s get meta and tell me what you think via the chatbot below 😉
Thanks for reading. Could you answer a few questions below? This is incredibly helpful for understanding my readers and helps me create better content. thanks so much. -Sean

Interesting usage of Typebot. Thanks for sharing the complete setup
Really Good idea and perfect execution.
Now is only needed to found a free service to manage the automation because active campaign is too expensive.
Thank you
What a clever way to make comments more engaging.
clever and useful integration
Great post, Nice way of using Typebot